Lambda is a feature included with AWS that allows users to write a function that runs without an EC2 instance. You can write these functions in many different languages, and AWS provides the "environment" in which they'll run. CLIPS is written in C, so in order to use CLIPS in an AWS Lambda, we must use the C++ Lambda Runtime. This article will step you through creating an AWS Lambda function that can run your C(++) code.
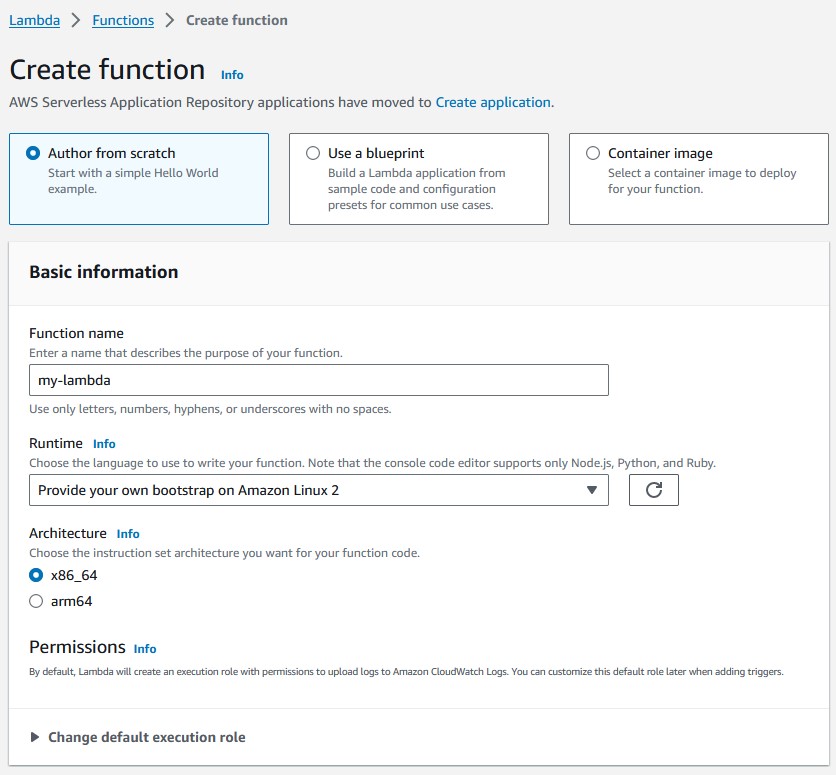
First, go to the Lambda section of your AWS Console. Then, click the "Create function" button. From here, provide a name for your function, and select "Provide your own bootstrap on Amazon Linux 2" as your Runtime. Then, click the "Create function" button at the bottom of this page.
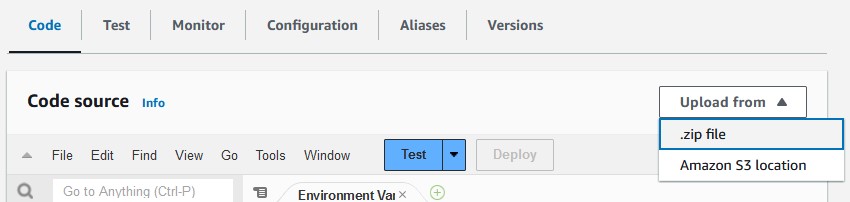
Below the "Function overview" section, you should see that the "Code" tab is selected. Click "Upload from" dropdown menu, then select ".zip file." The compilation process will create a zip file that we'll upload here.
Ok, now to the fun part: writing the code.
I'll reiterate the steps listed in the
C++ Lambda Runtime.
to install the AWS C++ SDK. You'll want to clone the repo from GitHub,
compile it, then install it. You'll need cmake, git,
make, and the curl development headers
on the computer you're compiling the SDK on. You'll run these
commands from the command line:
$ cd ~
$ git clone https://github.com/awslabs/aws-lambda-cpp.git
$ cd aws-lambda-cpp
$ mkdir build
$ cd build
$ cmake .. -DCMAKE_BUILD_TYPE=Release -DBUILD_SHARED_LIBS=OFF \
   -DCMAKE_INSTALL_PREFIX=~/out
$ make && make install
Now make a directory where you'll write your C++ lambda
and cd into it:
$ mkdir ~/my-lambda
$ cd ~/my-lambda
Download, extract, and compile the CLIPS source code:
$ wget https://sourceforge.net/projects/clipsrules/files/CLIPS/6.4.1/clips_core_source_641.tar.gz
# ... truncated output ...
HTTP request sent, awaiting response... 302 Found
Location: https://master.dl.sourceforge.net/project/clipsrules/CLIPS/6.4.1/clips_core_source_641.tar.gz?viasf=1 [following]
--2023-08-29 11:48:17--  https://master.dl.sourceforge.net/project/clipsrules/CLIPS/6.4.1/clips_core_source_641.tar.gz?viasf=1
Resolving master.dl.sourceforge.net (master.dl.sourceforge.net)... 216.105.38.12
Connecting to master.dl.sourceforge.net (master.dl.sourceforge.net)|216.105.38.12|:443... connected.
HTTP request sent, awaiting response... 200 OK
Length: 1081836 (1.0M) [application/x-gzip]
Saving to: ‘clips_core_source_641.tar.gz’

clips_core_source_641.tar.gz                    100%[====================================================================================================>]   1.03M  1.06MB/s    in 1.0s

2023-08-29 11:48:24 (1.06 MB/s) - ‘clips_core_source_641.tar.gz’ saved [1081836/1081836]
$ tar --strip-components=2 -xvf clips_core_source_641.tar.gz
# ... truncated output ...
$ make release_cpp
# ... truncated output ...
You should now have a libclips.a file in your current directory.
This is the file we'll use to bring CLIPS into our C++ lambda.
Make a CMakeLists.txt file with the following code in it:
cmake_minimum_required(VERSION 3.5)
set(CMAKE_CXX_STANDARD 11)
project(my-lambda LANGUAGES CXX)

find_package(aws-lambda-runtime REQUIRED)
add_executable(${PROJECT_NAME} "main.cpp")
target_link_libraries(${PROJECT_NAME} PUBLIC ${CMAKE_SOURCE_DIR}/libclips.a)
target_link_libraries(${PROJECT_NAME} PUBLIC AWS::aws-lambda-runtime)
aws_lambda_package_target(${PROJECT_NAME})
Our main.cpp file will use the C++ code described in the
official AWS documentation, but we'll also bring in CLIPS:
#include <aws/lambda-runtime/runtime.h>
#include "clips.h"

using namespace aws::lambda_runtime;

invocation_response my_handler(invocation_request const& request)
{
   Environment *mainEnv = CreateEnvironment();

   BatchStar(mainEnv, "program.bat");

   Run(mainEnv, -1);

   DestroyEnvironment(mainEnv);

   return invocation_response::success("ok", "text/plain");
}

int main()
{
   run_handler(my_handler);
   return 0;
}
Our program relies upon loading a program.bat file. Create that file
in the same directory as your main.cpp file so that it looks like
this:
(println "Hello from CLIPS!")
In order to include this in the .zip file that'll be created
when we compile our program, we'll need to edit the
~/out/lib/aws-lambda-runtime/cmake/packager file slightly.
Scroll towards the bottom of this file, then add a single line:
chmod +x "$PKG_DIR/bootstrap"
# some shenanigans to create the right layout in the zip file without extraneous directories
pushd "$PKG_DIR" > /dev/null
cp ../../program.bat .
zip --symlinks --recurse-paths "$PKG_BIN_FILENAME".zip -- *
ORIGIN_DIR=$(dirs -l +1)
mv "$PKG_BIN_FILENAME".zip "$ORIGIN_DIR"
popd > /dev/null
rm -r "$PKG_DIR"
echo Created "$ORIGIN_DIR/$PKG_BIN_FILENAME".zip
Now we'll compile it and create our .zip file:
$ mkdir build
$ cd build
$ cmake .. -DCMAKE_BUILD_TYPE=Release -DCMAKE_PREFIX_PATH=~/out
$ make
$ make aws-lambda-package-my-lambda
You should now have a my-lambda.zip file in your current directory.
Upload this file via the AWS console as detailed in the
Creating the Lambda section of this article.
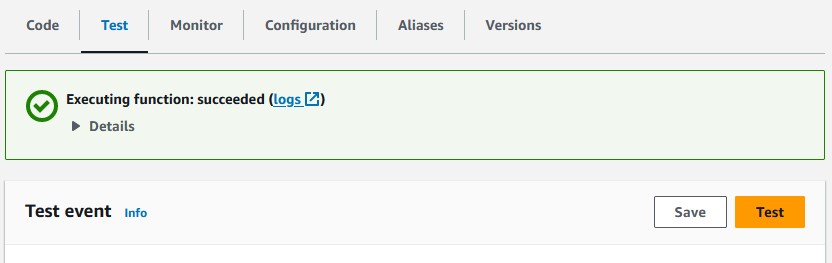
After we've uploaded our .zip file, we can finally test
things out. Navigating to the "Test" tab under the "Function overview"
section presents a "Test" button. Click this button to run the test.
You should see a success message. If you open this message, you'll see
that our lambda returned "ok." Clicking the "logs" link in that same
message window sends us to the CloudWatch logs for this lambda.
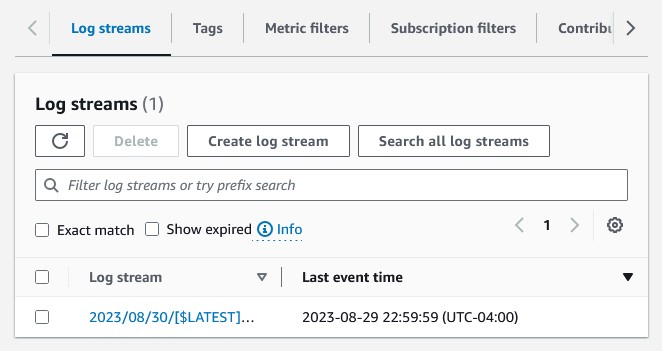
Click the first link in the table presented on this screen to see the output of our CLIPS program.
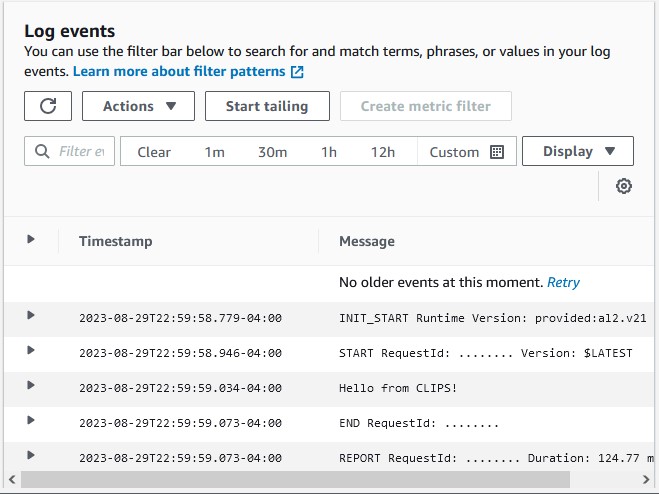
There's the output of our CLIPS program! You can see the text we printed
out using println in our program.bat file
on the third log line. Now we'll talk about how to
read the http request and write the response body from within CLIPS.
We can add different I/O methods to our CLIPS program by adding a
"Router." I discussed what a CLIPS Router is and how to do this in
a previous article, so we'll move right on
to implementation. Update your main.cpp file
so that it has two new Routers:
one for reading the request, the other for writing the response.
#include <string>
#include <sstream>
#include <aws/lambda-runtime/runtime.h>
#include "clips.h"

using namespace aws::lambda_runtime;

bool QueryOutCallback(Environment *env, const char *logicalName, void *_) {
  return strcmp(logicalName, "lambda-out") == 0;
}

void WriteOutCallback(Environment *env, const char *logicalName, const char *str, void *context) {
  std::stringstream *ss = (std::stringstream*)context;
  *ss << str;
}

bool QueryInCallback(Environment *env, const char *logicalName, void *_) {
  return strcmp(logicalName, "lambda-in") == 0;
}

int ReadInCallback(Environment *env, const char *logicalName, void *context) {
  invocation_request *request = (invocation_request*)context;
  char toReturn = '\n';
  if(!request->payload.empty()) {
    toReturn = request->payload.front();
    request->payload.erase(request->payload.begin());
  }
  return toReturn;
}

int UnreadInCallback(Environment *env, const char *logicalName, int c, void *context) {
  char c_char = (char)c;
  invocation_request *request = (invocation_request*)context;
  request->payload = c_char + request->payload;
  return c;
}

invocation_response my_handler(invocation_request const& request)
{
   Environment *mainEnv = CreateEnvironment();

   std::stringstream ss;

   AddRouter(
     mainEnv, "lambda-out", 20,
     QueryOutCallback,
     WriteOutCallback,
     NULL, NULL, NULL, &ss);

   AddRouter(
     mainEnv, "lambda-in", 20,
     QueryInCallback,
     NULL,
     ReadInCallback,
     UnreadInCallback,
     NULL,
     const_cast<void *>((const void *)(&request)));

   BatchStar(mainEnv, "program.bat");

   Run(mainEnv, -1);

   DestroyEnvironment(mainEnv);

   //return invocation_response::success("ok", "text/plain");
   return invocation_response::success(ss.str(), "text/plain");
}

int main()
{
   run_handler(my_handler);
   return 0;
}
QueryOutCallback and QueryInCallback
are simple: if the Router CLIPS attempts to printout
to or readln from is called lambda-out
or lambda-in respectively, we'll use this Router's
callback functions. WriteOutCallback is how
we'll write our http response. Its last argument context
is a void pointer. We cast it to a std::stringstream
so we can use it as a buffer. We'll eventually write the contents
of this std::stringstream to the response body of our
lambda function.
ReadInCallback also receives a context
void pointer. This is the request as sent in to the lambda handler,
so we can cast it as invocation_request. We'll read
the payload character by character. An invocation_request
has a property payload which is a std::string,
so we can use empty to make sure it's not empty before
"shifting" the first character from the string with
front, erase, and begin.
UnreadInCallback should do the opposite: it puts the
second const char argument back on to the front of the
string.
In my_handler, we add two calls to AddRouter
to add our new Routers. Note the funky casting we have to do
for the context argument of the lambda-in
Router function. That's because the invocation_request
is a const; we must first cast to a const void
pointer before casting to a void pointer.
Finally, we replace the hard coded "ok" with ss.str()
in our invocation_response::success call.
This will return the contents of our std::stringstream buffer
we wrote to in WriteOutCallback.
One final touch: we'll replace the contents of our
program.bat file so that it uses these two new routers:
(printout lambda-out "You sent: " (readline lambda-in))
This is effectively an echo server demonstrating how to get the request
and write the response from within your CLIPS program. From inside of your
build directory, follow the previous
compilation steps to generate a new .zip file:
$ make clean
$ make
$ make aws-lambda-package-my-lambda
Upload the new .zip file as described in our previous steps.
Now we'll click that "Test" button:
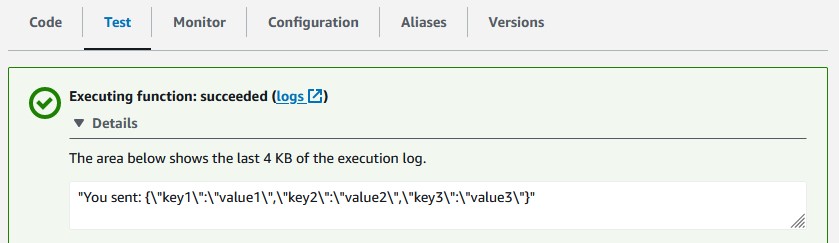
Voila!
In this article, we demonstrated how to use CLIPS from within an AWS lambda. We learned how to add Routers to CLIPS so that our Rules Engine could read the http request made to the lambda as well as write to the http response of the lambda. I hope this was helpful for you!
- ryjo